Online BankingClose online banking

Explore Your New Bill Pay Widget
Utilize Bill Pay to Send Payments to People or Businesses.
Utilize Bill Pay Tabs & Setup Payees
Your new Online Banking comes with so many new features that it can be tough to understand all of your options without spending time digging around. This is why over the next few months, we will be featuring articles and how-to’s on the newest and most popular Online Banking features. To start the series, we've created a quick overview of how to use your Bill Pay widget.
Bill Pay is one of our most popular Online Banking functions among members. Here we’ll discuss all the features and functions of the new Bill Pay widget.
Bill Pay is one of our most popular Online Banking functions among members. Here we’ll discuss all the features and functions of the new Bill Pay widget.
Tab Options
Under the Bill Pay widget, there are now four viewing tabs: Bill Pay Dashboard, MultiPay, Scheduled, and History. Each of these tabs provide convenient options for Bill Pay management. Here are some quick tips on the Bill Pay widget that can help you determine which Bill Pay tab to use.
Bill Pay Dashboard
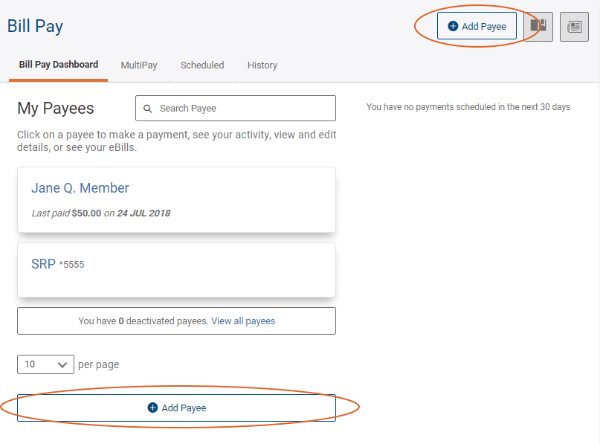
Use the Bill Pay Dashboard to add payees, begin a payment, see your activity, view and edit payment details, or check your eBills.
Multipay
Use the Multi Pay tab to pay multiple bills or Payees at the same time.SCHEDULED
Use Scheduled to view your next three months of scheduled payments, to view scheduled bill monthly totals, or to search scheduled payments by Payee, Account, or Date range.
Tip! Reoccurring or singular Payments will show instantly under Scheduled when submitted for a future date.
HISTORY
Use History to view or search your completed Bill Payment transactions. You have the option to search your history by Payee, Account, Status, or Dates.
Tip! If a payment is sent immediately or has been processed it will move to the History tab. Once in History, the payment cannot be edited or canceled.
Adding Payees
If you’re just getting started with Bill Pay, or you have a new payment to make, adding your payee will be the first step!
You can add a payee from any tab in the Bill Pay widget by clicking the button labeled “+ Add Payee” on the widget title bar. (You can also add a payee by clicking the “Add Payee” button on the bottom of the bill pay dashboard)

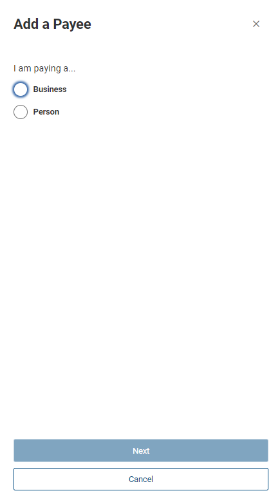
Next, select your Payee category: Business or Person.

Fill in the associated fields and save your new payee.
 |
 |
Note: Bill Payments to People will always be sent as a check.
After confirmation, your new payee will immediately populate and be available for use from the bill pay dashboard or MultiPay tabs . You can manage the payee details anytime from the Dashboard tab by clicking the Payee name, then “Manage” to edit the details, deactivate payees, or delete payees when you no longer need them in Bill Pay.
Now you are a Bill Pay expert! Log in to Online Banking to set up bill payments or payees now.
This article was updated on 01.14.19 to reflect changes in the Bill Pay widget options.

Air Force Credit Union of the Year
Serving military members and veterans is foundational to our mission, and has recently earned us the distinction...

Certificates Are For Everyone
Certificates are no longer exclusive to serious investors. They are for anyone, at any stage of life.

Don't be a Skimmer Victim
From ATMs, to fuel pumps, and point-of-sale terminals at your favorite retailer, devices built to steal...
SWIPE
Feedback form
Credit Union West
Member Survey
On a scale from 0-11, how likely are you to recommend Credit Union West to a friend or colleague?
There was an error submitting the form
